
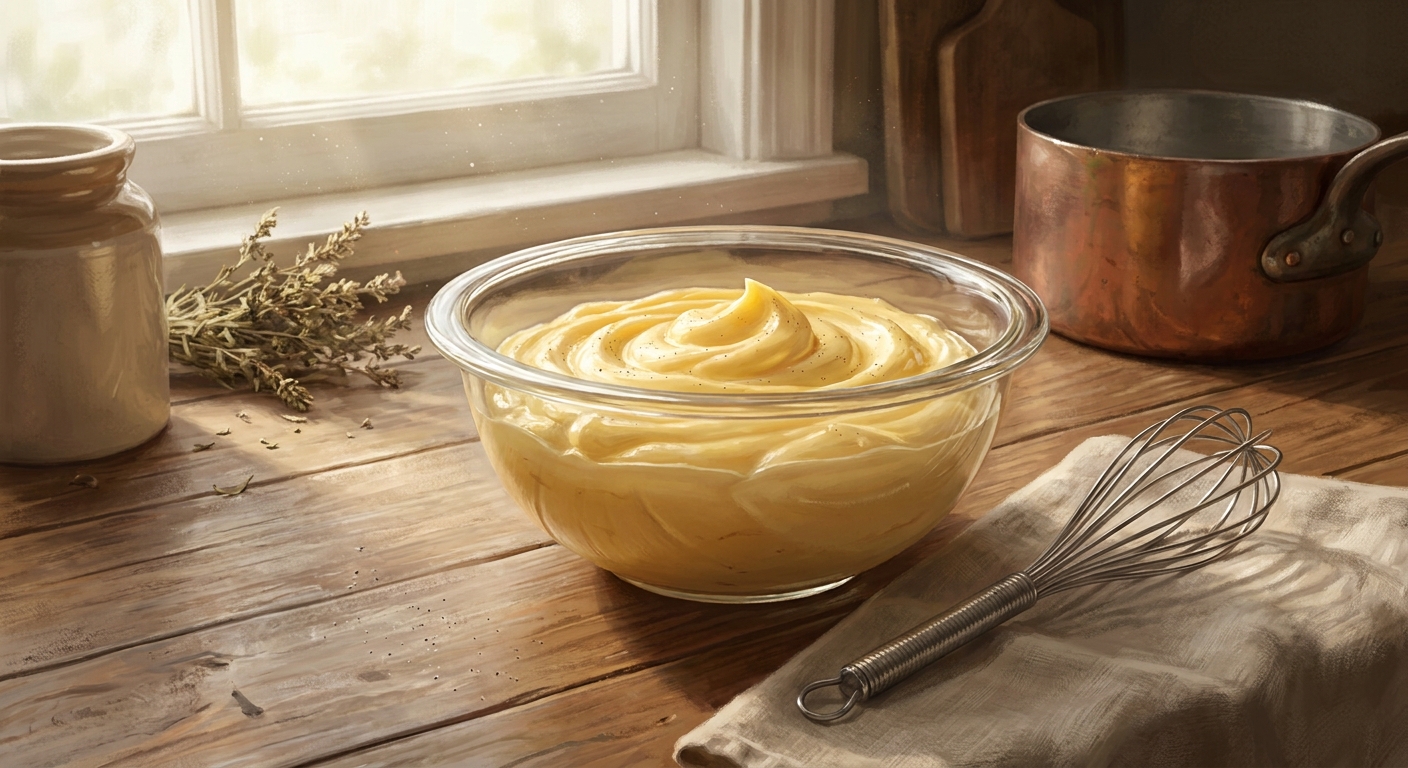
Mastering the Art of venetian cream in Your Kitchen
Look, if you haven’t tried making venetian cream yet, you are seriously missing out on a pastry game-changer that will completely elevate your home baking. I vividly remember the first time I actually tasted it. I was sitting in a tiny, dimly lit coffee shop right in the heart of Lviv during a bitter winter storm. The barista handed me this incredibly delicate pastry filled with something that looked a bit like an ordinary custard, but tasted entirely different. That rich, velvety texture hit my palate, and I instantly knew this wasn’t your standard, heavy vanilla filling. It was a revelation.
Fast forward to 2026, and this exact cream has become my absolute go-to for elevating almost any dessert I whip up. It perfectly bridges the frustrating gap between a heavy, cloying buttercream and a too-light, ephemeral whipped cream. It gives you this flawlessly balanced, luxurious mouthfeel that makes your guests genuinely think you spent hours slaving away in a professional kitchen. Whether you are piping it into a classic sponge cake, filling a sophisticated fruit tart, or just eating it off a spoon (no judgment here), mastering this mixture changes everything. You really don’t need fancy culinary degrees to pull it off, either. Just a bit of patience, a sturdy whisk, and the right ratio of standard pantry ingredients. Let me walk you through exactly why this stuff is pure magic and how you can start making it yourself without losing your mind.
So, what exactly makes this mixture so special compared to the dozens of other frostings and fillings out there? When you whip up a fresh batch, you get this unbelievable versatility that standard icing just cannot match. For instance, imagine eating a classic French eclair. If you use a standard custard, it can often be far too runny and make the pastry soggy. If you use a standard American buttercream, it feels way too dense and leaves a greasy coating in your mouth. This filling sits perfectly in the middle, holding its shape beautifully without ever feeling heavy on the tongue. Another great example is fresh fruit tarts. The slight dairy richness complements the bright tartness of fresh berries flawlessly, creating a harmony of flavors that practically dances on your tastebuds.
Let’s break down exactly how it stacks up against other popular dessert fillings so you can see exactly what I mean when I say it is superior in almost every way.
| Filling Type | Texture Profile | Best Used For |
|---|---|---|
| Venetian Cream | Velvety, light yet perfectly stable | Eclairs, layered cakes, sophisticated tarts |
| Standard Buttercream | Very dense, extremely sweet, heavy | Cupcake piping, robust tiered cakes |
| Crème Pâtissière | Soft, thick, pudding-like consistency | Basic cream puffs, fruit tart base layers |
Here is exactly how you can start integrating it into your weekly baking routine without getting overwhelmed:
- Master the base emulsion: Getting the egg yolks and sugar to that perfect pale, thick ribbon stage is totally non-negotiable. Don’t rush this step; it builds the foundation for everything.
- Fold, don’t stir: When you introduce the lighter elements later on, treat them gently. Aggressive stirring actively kills the airy texture we are aiming for, knocking out all the trapped air.
- Chill time is flavor time: Letting it rest properly in the fridge isn’t just about setting the physical texture; it actually allows the subtle vanilla notes to mature, deepen, and permeate the entire batch.
The Whispered Origins of the Recipe
Believe it or not, the story behind this luscious filling traces back centuries. Legend has it that it was first conceptualized by clever bakers working for affluent merchant families who desperately wanted something lighter than the incredibly dense, heavy almond pastes that were so popular at the time. They needed a filling that whispered quiet luxury rather than shouting it. The original, rustic versions relied heavily on whatever fresh, high-fat dairy was brought in from the surrounding countryside that morning, mixed with wildly expensive exotic spices coming through the bustling trade routes. It was a status symbol just as much as it was a delicious dessert component.
Evolution Through the Centuries
As time passed and trade became easier, the secret recipe naturally traveled. It moved from highly exclusive, heavily guarded merchant kitchens directly into the capable hands of everyday pastry chefs spread across Europe. Each specific region happily added its own subtle tweak to the formula. Some rebellious bakers added a vibrant splash of citrus liqueur, while others stubbornly insisted on a heavy dusting of freshly grated nutmeg. The core technique, however, remained incredibly consistent: a hyper-careful temperature control that prevents the delicate eggs from scrambling while achieving maximum thickness. By the late 19th century, it had successfully cemented itself as an absolute staple in high-end, fashionable tea rooms, always served alongside incredibly delicate porcelain cups of hot Earl Grey.
The Modern State of the Dessert World
Today, we are seeing a massive, exciting resurgence of old-school, traditional techniques, and this velvety mixture is absolutely leading the charge. Bakers in 2026 are practically obsessed with returning to authentic, flavor-forward, honest recipes rather than relying on the hyper-sweet, artificially colored frostings that dominated the early 2000s. You will find it heavily featured in hipster bakeries in Brooklyn, traditional patisseries scattered across Paris, and yes, even my favorite little coffee spots right here in Kyiv. It has adapted beautifully to modern equipment, too. What used to literally take an hour of vigorous, exhausting hand-whisking over a hot stove now takes mere minutes with a powerful stand mixer, yet the warm, comforting soul of the dessert remains entirely intact.
The Chemistry of the Perfect Emulsion
Let’s get just a little bit nerdy for a second because understanding the science makes you a significantly better baker. The magic happening in your saucepan is all about emulsion and protein denaturation. When you heat up those egg yolks, their tightly folded protein structures start to unravel and stretch out. If you heat them way too fast, they panic, tangle up tightly with each other, and you instantly get scrambled eggs. Gross, and completely unfixable. But if you temper them gently by slowly adding hot, steaming dairy while whisking constantly, those proteins calmly form a delicate, invisible microscopic net. This intricate net traps water and fat molecules perfectly evenly, creating that unbelievably smooth, glossy finish we all crave. The starch you add (usually a bit of cornstarch or plain flour) acts as a brilliant insurance policy, physically coating the proteins and making it infinitely harder for them to clump together and ruin your day.
Temperature Control and Viscosity Dynamics
Viscosity is really just a fancy, scientific word for how thick or runny a liquid happens to be. In this specific case, managing viscosity is entirely dependent on hitting the exact right temperature window. You want to reach about 160°F (71°C) to 170°F (76°C) to fully cook the raw starch out and safely pasteurize the eggs, but pushing it past 185°F (85°C) is essentially playing with fire and risking a lumpy disaster.
- Fat content matters immensely: Using whole milk (around 3.25% fat) provides the necessary lipids to pleasantly coat the palate, effectively masking any lingering raw starch flavors.
- Sugar as a chemical tenderizer: Sugar doesn’t just add straightforward sweetness; it actively interferes with protein coagulation, physically raising the temperature at which the eggs will curdle and giving you a wider margin of error.
- Rapid cooling dynamics: Fast, aggressive cooling prevents a tough skin from forming on top and stops the residual cooking process dead in its tracks, preserving that silky, luxurious mouthfeel.
Day 1: The Classic Eclair Fill
Ready to actually use this stuff? I put together a fun, highly practical 7-day pastry plan that utilizes one big batch of our star ingredient so absolutely nothing goes to waste. On day one, bake a simple, straightforward batch of choux pastry. Once the golden shells cool completely, pipe your fresh, beautifully chilled filling right into the hollow center. Top the whole thing with a dark, shiny chocolate glaze. It is the absolute perfect introduction to how the unique texture holds up inside a delicate shell.
Day 2: Morning Brioche Stuffer
Grab some leftover, slightly stale brioche buns. Slice them wide open, toast them lightly in a warm pan with a bit of butter, and spread a massively generous dollop of your cream right inside. Pair it immediately with a dark, incredibly strong espresso for the ultimate Tuesday morning pick-me-up that will make your coworkers extremely jealous.
Day 3: Fresh Berry Tartlet Base
Press a simple, buttery shortcrust pastry into mini tart tins and bake them blind until golden. Fill the thoroughly cooled shells completely to the brim and painstakingly arrange fresh, vibrant strawberries and plump blueberries on top. The bright acidity of the fresh fruit balances the rich, heavy dairy perfectly.
Day 4: Layered Trifle Cups
Crumble up literally any leftover cake scraps you happen to have lying around the kitchen. Layer them haphazardly in a clear glass with heavy spoonfuls of your creamy filling and a quick, tangy fruit compote. It takes maybe ten minutes of active work and looks incredibly fancy and intentional.
Day 5: The Ultimate Crepe Cake
Make a tall stack of thin, delicate, buttery crepes. Use the velvety mixture as the delicious glue spreading evenly between every single layer. Let the entire massive cake chill in the fridge overnight so it sets up and slices perfectly cleanly the next day for an elegant afternoon tea.
Day 6: Upgraded Weekend Donuts
Fry up a batch of simple, fluffy yeast donuts. Instead of using a standard, overly sweet jelly fill, violently pump them entirely full of this rich, custard-like alternative. Dust the outsides heavily with bright white powdered sugar. I promise you will never happily buy standard bakery donuts ever again.
Day 7: Sunday Morning Pancakes
Take the last remaining spoonfuls hiding in the bowl, thin them out aggressively with a tiny splash of cold milk, and fiercely whisk until smooth. Use it as a wildly decadent syrup alternative, pouring it directly over a massive, steaming stack of fluffy buttermilk pancakes. A brilliant, satisfying end to the week.
People often get really intimidated by classic pastry techniques, which predictably leads to a lot of silly, persistent rumors. Let’s clear the air right now.
Myth: You absolutely need a specialized double boiler to make it safely without ruining the batch.
Reality: A standard, heavy-bottomed saucepan placed directly over low-medium heat works perfectly fine. Just keep whisking constantly, feeling the bottom of the pan with the whisk, and you won’t scorch a single thing.
Myth: It takes multiple hours to chill properly before you can even think about using it.
Reality: If you cleverly spread the hot, steaming mixture into a shallow, very wide dish and aggressively press plastic wrap directly onto the surface, it can cool completely in the fridge in under 45 minutes.
Myth: You can only use extremely expensive, real vanilla pods, or it tastes terrible and cheap.
Reality: While a real pod is visually stunning with those beautiful little black specks, a high-quality, robust vanilla bean paste or even a premium liquid extract yields absolutely incredible, mouth-watering results for a tiny fraction of the cost.
Can I freeze the finished cream?
No, please don’t. The delicate structural emulsion breaks down completely and separates into a watery, lumpy mess when thawed. Keep it in the fridge for up to four days max.
Why did mine turn out horribly lumpy?
You most likely heated it way too fast or stopped whisking to check your phone. Don’t panic! Just forcefully push the warm mixture through a fine-mesh metal sieve to save it.
Can I make it entirely dairy-free?
Yes, absolutely! Full-fat oat milk and canned coconut milk work surprisingly well as direct substitutes, though the final flavor profile will shift slightly to accommodate the new ingredients.
What if my batch is way too runny?
It probably didn’t boil long enough for the raw cornstarch to fully activate and swell. Return it to the stovetop heat immediately and whisk vigorously until thick bubbles pop on the surface.
Does it work well under heavy fondant?
I genuinely wouldn’t recommend it. It is entirely too soft and absolutely requires strict refrigeration, which unfortunately makes sugar fondant sweat, droop, and melt miserably.
Can I flavor it with dark chocolate?
Absolutely you can. Whisk in a half cup of high-quality, finely chopped dark chocolate right after taking the pan off the heat. Keep stirring until it is entirely melted and beautifully smooth.
How do I stop a gross skin from forming on top?
Always firmly press a sheet of plastic wrap directly onto the actual surface of the warm mixture before chilling it. If air touches it while warm, a rubbery skin will inevitably form.
Honestly, once you nail this recipe, your entire home baking repertoire expands instantly and effortlessly. It is wonderfully rich, it is incredibly adaptable, and it firmly proves that taking the time to bake homemade always, without fail, beats buying store-bought alternatives. Grab your favorite whisk, trust the chemical process, and go make something wildly delicious today!
Leave a Reply