

Mastering the Perfect Bacio Cake
Let me tell you about the first time I tried baking a bacio cake. You know how everyone has that one dessert that completely rewires their tastebuds? This is it. Picture this: I was actually sitting in a tiny, dimly lit café in Lviv, waiting out a sudden autumn downpour, when the barista handed me a slice of what looked like pure chocolate magic. I took one single bite, and the rich hazelnut praline mixed with dark chocolate just melted instantly on my tongue. The contrast was absolutely unbelievable. The truth is simple: anyone can recreate that exact café-level hazelnut and chocolate masterpiece right in their own kitchen without breaking a sweat. It looks complicated, but honestly, it is mostly about layering good ingredients and having a little bit of patience. You do not need to be a fancy pastry chef to pull this off.
I spent weeks trying to reverse-engineer that specific flavor profile I found in Ukraine, blending premium roasted hazelnuts with the silkiest ganache I could whip up. Once you get the hang of the base layers, the rest is just straightforward assembly. Trust me, once you make this at home, your friends will constantly beg you to bring it to every single dinner party. Let’s talk about why this specific treat deserves the top spot in your weekend baking rotation.
The Core of the Hazelnut Chocolate Experience
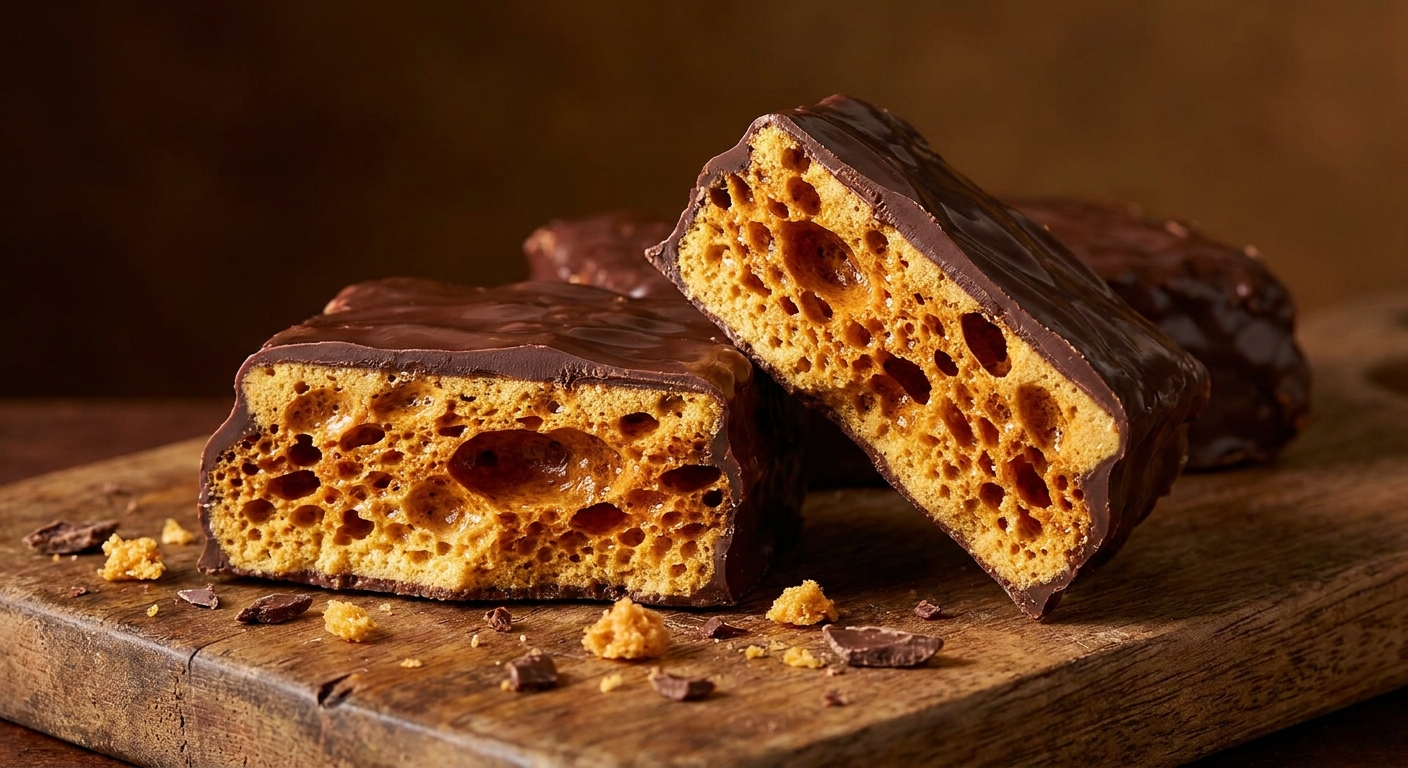
So, why do we love this specific dessert so much? The core of any great baking endeavor is the balance of textures, and the bacio cake absolutely nails the crispy-creamy divide. You are getting the deep, roasted crunch of whole nuts against the soft, yielding sponge and velvety mousse. It is a full sensory experience.
Think about what makes a dessert truly memorable. First, contrasting mouthfeel. When you bite through a crisp chocolate shell into a soft hazelnut cream, your brain immediately registers it as a premium, handcrafted experience. Second, flavor longevity. Dark chocolate and roasted nut oils linger on the palate long after the bite is gone, giving you a deeply satisfying finish that overly sugary desserts just miss entirely.
Let’s break down the essential layers of this beauty so you know exactly what we are building:
| Layer Component | Primary Ingredient | Flavor Profile |
|---|---|---|
| Genoise Sponge | Fine Cocoa Powder | Deep, airy, slightly bitter |
| Praline Crunch | Roasted Hazelnuts | Nutty, caramelized, crispy |
| Chocolate Mousse | 70% Dark Chocolate | Velvet, rich, intense |
How exactly do you approach building this? Here are the golden rules:
- Preparation is everything: Always roast your own nuts. Pre-roasted store-bought bags never have the right essential oils active.
- Temperature control: Your heavy cream for the mousse must be ice cold, while the melted chocolate needs to be just barely warm, never hot.
- Patience during setting: Rushing the chill time will cause the layers to bleed into one another, ruining that beautiful cross-section cut.
Honestly, I used to skip the praline crunch step because it felt like extra work. Big mistake. That crunch layer acts as the vital bridge between the soft sponge and the rich mousse. It traps the moisture of the cake while keeping its snap. I cannot stress enough how much a little toasted sugar and nut mixture elevates the whole plate.
Origins of the Bacio Concept
Where did this specific flavor profile even come from? The word “bacio” translates directly to “kiss” in Italian, specifically pointing to those famous foil-wrapped chocolate kisses born in Perugia, Italy, back in the early 20th century. Luisa Spagnoli originally created them to use up leftover chopped hazelnuts from her growing chocolate factory. She mashed them with chocolate, topped the little mound with a whole nut, and coated it in dark chocolate. The flavor was so instantly iconic that pastry chefs worldwide eventually started asking: how do we turn this bite-sized candy into a full-scale dining dessert?
Evolution into a Layered Masterpiece
By the time the late 1990s and early 2000s rolled around, fine dining establishments began deconstructing classic candies. The transition from a simple truffle into a multi-layered torte was gradual but brilliant. Bakers started experimenting with hazelnut flour in their sponges to mimic the candy’s core. Then, they realized they needed the crunch, leading to the introduction of feuilletine mixed with hazelnut paste. Over the decades, the recipe shifted from a dense, brownie-like structure to the elegant, mousse-heavy entremets we see in high-end pastry shop windows today.
The Modern State of Hazelnut Baking
Right now, in 2026, the global baking scene has fully embraced hybrid textures. The modern iteration of this dessert usually involves glossy mirror glazes and highly precise geometric silicone molds. Yet, the rustic, home-baked version remains incredibly popular because the flavor combination is fundamentally comforting. We are seeing trends where home bakers incorporate local ingredients, perhaps using wild forest nuts instead of imported varieties. The essence remains unchanged, though. It is all about celebrating the flawless marriage of bitter cocoa and sweet roasted hazelnut. Even vegan and gluten-free adaptations are taking over cafe menus, utilizing almond flour and coconut cream to achieve that exact decadent mouthfeel. The demand for this specific taste profile has never been higher.
The Science of Emulsions
When you build the mousse for this cake, you are actually playing with advanced food science right in your mixing bowl. A mousse relies on a highly stable emulsion, which means forcing fat molecules from the chocolate to bond smoothly with water and air from the whipped cream. If your chocolate is too hot when you fold in the cold cream, the cocoa butter separates, causing the fat to break and leaving you with a grainy, greasy mess. If the chocolate is too cold, it seizes into hard little chips. The absolute sweet spot is around 35°C (95°F). At this precise temperature, the cocoa butter is fluid enough to blend seamlessly but cool enough not to melt the delicate air bubbles suspended in your whipped cream. Think of it like building a microscopic scaffolding out of fat and air; you need to be gentle so the structure holds up your entire dessert.
Flavor Compounds in Roasting
Why do we obsess over roasting the nuts first instead of using them raw? It comes down to the magic of the Maillard reaction. This is the chemical reaction between amino acids and reducing sugars that gives browned food its distinctive flavor. When you heat raw nuts, you are not just warming them up; you are fundamentally altering their chemical structure.
- Pyrazines: These are the specific organic compounds created during roasting that your brain immediately identifies as nutty, earthy, or toasted.
- Lipid Oxidation: Gentle heat softens the cellular walls of the nut, allowing the natural oils to migrate to the surface, carrying intense flavor directly to your taste receptors.
- Caramelization: The natural sugars in the nuts brown under heat, removing raw bitterness and replacing it with a complex, sweet depth that pairs flawlessly with dark cocoa.
By understanding these baseline chemical interactions, you stop just blindly following a recipe and start truly cooking with intent and precision.
Step 1: Procuring the Right Ingredients
Start by sourcing high-quality Dutch-processed cocoa powder, fresh raw hazelnuts, and 70% baking chocolate bars. The chocolate quality dictates the entire flavor profile of the dessert. Do not buy cheap chocolate chips; they contain chemical stabilizers that ruin the melting process and leave a waxy film in your mouth.
Step 2: Roasting and Skinning
Place your raw nuts on a baking sheet at 175°C (350°F) for 12 to 15 minutes until fragrant. Wrap them hot in a clean kitchen towel and rub them vigorously together to remove the bitter, papery skins. Let them cool completely before grinding.
Step 3: Baking the Genoise Sponge
Whip your whole eggs and granulated sugar over a gentle double boiler until they reach the ribbon stage and triple in volume. Gently fold in your sifted dry ingredients using a spatula. Bake until just springy to the touch. Overbaking kills the sponge and makes it rubbery.
Step 4: Crafting the Praline Crunch
Melt a bit of high-quality milk chocolate and mix it with hazelnut praline paste and crushed wafer cookies (known as feuilletine). Spread this mixture very thinly over your cooled sponge cake layer. This acts as a delicious waterproof barrier, sealing the cake from getting soggy later.
Step 5: Whipping the Chocolate Mousse
Melt your dark chocolate gently and let it cool to that magic 35°C mark. Whip your heavy cream to soft, droopy peaks. Gently fold the whipped cream into the chocolate in three separate batches, keeping as much air in the mixture as humanly possible.
Step 6: Assembly and Chill
Pour the prepared mousse over the sponge and crunch layers inside a tight-fitting springform pan. Use an offset spatula to smooth the top perfectly flat. Now, walk away. It needs at least six full hours in the fridge to set properly.
Step 7: The Final Glaze and Garnish
Once fully set and chilled, pour a simple, glossy chocolate ganache over the top of the cake. Decorate the borders with whole toasted hazelnuts, a dusting of cocoa powder, and maybe a sprinkle of edible gold leaf if you are feeling exceptionally fancy. Serve slightly chilled.
Myths and Reality of Hazelnut Pastry
Let us clear up some common misconceptions that scare home cooks away from making this at home.
Myth: You need expensive professional equipment to make entremets.
Reality: A basic springform pan, a metal mixing bowl, and an electric hand whisk are totally sufficient. You do not need expensive silicone molds unless you desperately want a specific geometric shape for a photo.
Myth: Hazelnut extract works just as well as real nuts.
Reality: Absolutely not. Extract gives a flat, artificial flavor that often tastes like cheap coffee syrup. You need the physical roasted nuts and their natural oils for authentic, robust depth.
Myth: The cake must be eaten immediately after glazing.
Reality: This dessert actually improves significantly after sitting in the fridge for 24 hours. The flavors meld, the moisture redistributes, and the mousse stabilizes perfectly. Making it a day ahead is actually the preferred method.
Myth: Gelatin is absolutely mandatory for the mousse.
Reality: While commercial bakeries use it for long-term display stability in warm cases, a home-baked version relies entirely on the cocoa butter setting up perfectly in the fridge. No gelatin is needed if you temper the cream right.
Frequently Asked Questions
Can I freeze the leftovers?
Yes, tightly wrap individual slices in plastic wrap, then foil. They freeze beautifully for up to a month and thaw quickly in the fridge.
What if my mousse breaks?
If it looks grainy or split, gently fold in a tablespoon of cold heavy cream to try and restore the emulsion. Do not overmix.
Can I use almonds instead?
You can, but it changes the flavor profile entirely. It will be delicious, but it will not be the classic Italian taste.
Does the sponge need simple syrup?
Usually, yes. Brushing the baked sponge with a little espresso or Frangelico syrup keeps it super moist and adds incredible flavor.
Why did my glaze lose its shine?
Condensation from the fridge can dull the beautiful finish. Glaze it as close to serving time as possible for the best photos.
Can I make it gluten-free?
Absolutely. Swap the wheat flour in the sponge for a 1:1 gluten-free baking mix or fine almond flour. The mousse is naturally gluten-free.
How do I cut clean slices?
Use a hot, completely dry chef’s knife. Dip the blade in boiling water, wipe it perfectly dry with a towel, and slice immediately. Repeat for every cut.
How do I store the toasted hazelnuts?
Keep them in an airtight glass container in a dark, cool pantry. They can go rancid quickly if left exposed to heat and light.
Is it possible to make this nut-free?
Technically, replacing the hazelnut with toasted sunflower seeds works for allergies, but you fundamentally lose the signature flavor profile.
Making a breathtaking bacio cake is completely within your reach. Just take your time with the individual steps, respect the temperatures, and buy the best chocolate you can afford. Ready to blow your guests away at the next gathering? Grab your whisk, start roasting those nuts, and leave a comment below letting me know how your bake turns out!
Leave a Reply