
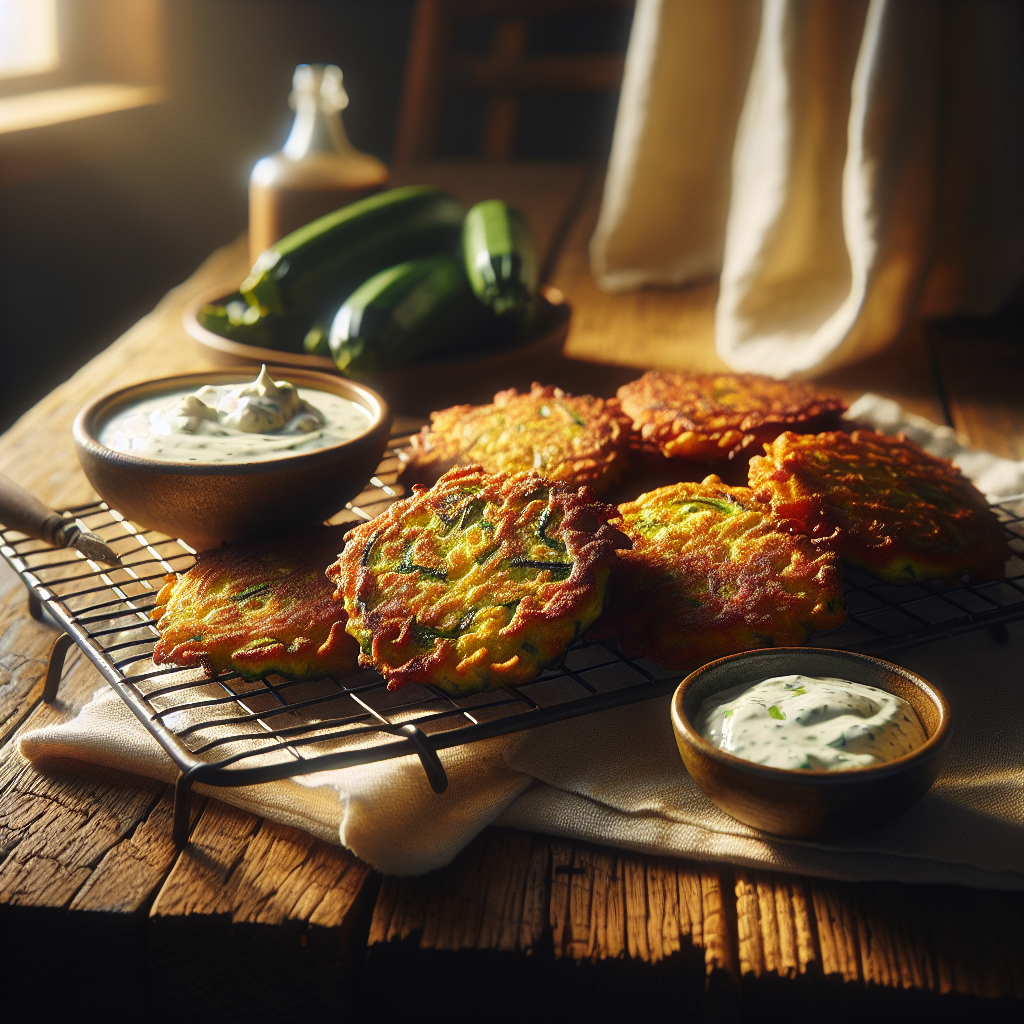
Crispy and Authentic Italian Zucchini Fritters
Have you ever wondered why perfectly cooked italian zucchini fritters taste like a bite of pure Mediterranean heaven? I was standing in my small kitchen in Kyiv, staring at a massive pile of fresh summer squash from the local dacha, trying to figure out how to recreate that magical crispiness I experienced in Napoli last summer. You know the feeling perfectly well—you want something savory, light, yet incredibly satisfying for dinner, but you also want it fast. These fritters are exactly that. They are the ultimate comfort food that bridges the gap between a healthy vegetable snack and an indulgent fried treat. Cooking these has become a weekly ritual for me here in Ukraine, seamlessly blending local, farm-fresh produce with classic Mediterranean techniques.
When I first tried making them years ago, they turned out soggy and sad. But after a few tweaks and learning the absolute secret Italian method of salting and draining the vegetables, everything changed dramatically. Today, I am sharing this foolproof technique with you, step by step. You will get crispy edges, tender and fluffy centers, and a flavor profile that sings with garlic, parmesan, and fresh herbs. Trust me on this one; once you make this batch, your family will devour them before they even have a chance to cool down on the rack. Let me walk you through exactly how you can master this beloved classic without any stress in your own kitchen. Grab your grater, tie your apron, and let us get cooking right now.
Why do these golden bites work so incredibly well? The secret lies entirely in moisture control and finding the perfect binding agents. When you grate fresh squash, it releases a massive amount of hidden water. If you skip the draining process, you end up with a watery, diluted batter that literally falls apart the second it touches the hot pan. By heavily salting the shreds and aggressively squeezing them dry in a clean kitchen towel, you concentrate the vegetable’s natural sweetness and create a sturdy, reliable base.
These fritters offer massive benefits for any home cook. First, they are an incredible way to hide vegetables from picky eaters. Kids just see a golden, crispy pancake and immediately dig in. Second, they are highly versatile. You can serve them as an elegant party appetizer with a sharp garlic aioli, or as a light weeknight dinner alongside a crisp, acidic salad.
Here is how they stack up against other popular vegetable patties:
| Feature | Italian Zucchini Fritters | Potato Latkes | Corn Fritters |
|---|---|---|---|
| Main Binder | Flour, eggs, parmesan cheese | Flour, eggs | Cornmeal, milk, eggs |
| Texture Profile | Crispy edges, soft herb-filled center | Ultra crunchy throughout | Doughy, sweet, and soft |
| Prep Time | 20 minutes (including resting phase) | 30 minutes | 15 minutes |
| Flavor Notes | Savory, cheesy, garlic-forward | Starchy, salty, earthy | Sweet, buttery, mild |
To nail this dish every single time, follow these core principles:
- Grate the vegetables coarsely to maintain a distinct, satisfying texture rather than reducing them to a mushy, unrecognizable paste.
- Salt the shreds aggressively and wait at least ten to fifteen minutes to actively draw out all the excess liquid trapped inside the cell walls.
- Squeeze out the water with absolute force; the drier the vegetable matter, the crispier the final result will be when fried.
- Fry the mixture in a shallow layer of neutral oil with a high smoke point until both sides are a deep, beautiful golden brown.
I remember making a huge batch of these last weekend, and the mouth-watering aroma of melting parmesan and sizzling olive oil filled my entire apartment. It is a sensory experience you simply cannot beat, turning an ordinary afternoon into a culinary event.
Origins of the Frittelle
The concept of frying battered vegetables dates back centuries in the Mediterranean basin. In Italy, these savory treats are often affectionately called frittelle di zucchine. Historically, poor farming communities needed highly inventive ways to utilize massive summer harvests without letting anything go to waste. Zucchini grows prolifically, almost aggressively, and families often found themselves with way more squash than they knew what to do with. By mixing the freshly grated vegetable with simple, cheap pantry staples like flour, eggs, and leftover hard cheese rinds, they created a calorie-dense, deeply satisfying meal out of virtually nothing. It was a purely pragmatic invention born out of harsh agricultural necessity, yet it tasted like sheer luxury to those eating it.
Evolution Across Regions
As the recipe organically moved across different Italian regions, it rapidly adapted to highly localized tastes and available ingredients. In the hot, sun-drenched south, specifically around the rugged coasts of Naples and Calabria, local cooks started adding fiery chili flakes and fresh mint for a vibrant, spicy, and refreshing kick. Meanwhile, northern Italians leaned heavily toward using rich, creamy butter for frying and incorporating delicate, earthy herbs like marjoram, sage, or thyme. By the mid-20th century, as massive waves of Italian immigrants proudly brought their culinary traditions across the globe, the basic recipe started showing up in extremely diverse forms. They adapted it to whatever pans, oils, and flours were locally available, fiercely keeping the core technique alive for future generations.
Modern State of the Dish
Fast forward to the year 2026, and this humble, rustic peasant dish has completely unexpectedly found its way onto the menus of high-end bistros and incredibly expensive gourmet cafes worldwide. Top-tier chefs now constantly experiment with adding luxurious truffle oil, specialized artisanal gluten-free flours, and complex, exotic dipping sauces. Despite all these flashy modern twists, the traditional home-cooked version remains virtually untouched and unchanged. The absolute beauty of this recipe is its stubborn timelessness. You do not need fancy, expensive equipment or rare, hard-to-find ingredients to make it work. The massive modern craving for plant-based, whole-food recipes has only skyrocketed the popularity of these golden bites, proving beyond a shadow of a doubt that sometimes, the oldest culinary tricks are simply the best ones.
The Chemistry of Crispy Edges
Achieving the absolutely perfect texture is actually a fascinating matter of pure food science. When you carefully drop the thick batter into the shimmering hot oil, a highly complex process called the Maillard reaction immediately takes place. This chemical reaction between amino acids and reducing sugars gives browned food its incredibly distinctive, savory flavor. The proteins found in the egg and the natural sugars inherent in the squash interact rapidly at temperatures precisely above 285°F (140°C). Furthermore, the starches in the flour gelatinize upon contact with the heat, creating a firm structural web that tightly holds the grated green strands together. If the batter is too wet, the temperature of the oil drops drastically and immediately. This unfortunate drop causes the entire mixture to steam lazily rather than violently fry, leading directly to a greasy, limp, and entirely unappetizing disaster.
Moisture Extraction Mechanics
The single most critical scientific step in this entire process is osmosis. By aggressively salting the raw grated vegetable, you actively create a hypertonic environment on the very exterior of the microscopic plant cells. Desperate to balance the harsh salt concentration, water physically rushes out of the interior of the cells. This massive exodus completely breaks down the rigid cellular structure of the squash, making the vegetable highly pliable and successfully releasing up to thirty percent of its total water weight into your bowl.
- Zucchini is naturally composed of approximately 94% water by weight, making strict osmotic extraction absolutely mandatory for any successful frying endeavor.
- Eggs act as a powerful natural emulsifier; their rich lecithin content flawlessly binds the disparate fats and remaining moisture into a cohesive, workable batter.
- Aged Parmesan cheese contains extremely high levels of natural glutamates, which scientifically trigger the highly desired umami taste receptors on your tongue, tricking the brain into tasting meatiness.
- Frying in high-quality olive oil provides a highly specific lipid profile that naturally coats the exterior crust without deeply penetrating the inner starch matrix, assuming the oil temperature is kept strictly around 350°F (175°C).
Understanding these tiny, unseen chemical interactions gives you complete, absolute control over your daily cooking. You are no longer just blindly following a recipe on a screen; you are literally manipulating microscopic cellular structures and complex thermal dynamics to actively create the ultimate savory bite. It is practically a delicious, highly rewarding science experiment happening right on your stovetop.
Now, let us put all this fascinating theory into a highly actionable, foolproof step-by-step master plan. Here is your definitive, absolute guide to preparing the ultimate batch from start to finish.
Step 1: The Initial Shred
Grab two medium-sized, firm fresh squashes from the fridge. Wash them thoroughly under cold water and carefully trim off both ends. Use the largest holes of a standard metal box grater. Do not, under any circumstances, use a food processor for this step, as the aggressive mechanical blades will completely obliterate the flesh and turn it into watery mush. You want distinct, long, beautiful shreds that will hold their shape.
Step 2: The Osmotic Salt Bath
Place the freshly grated shreds directly into a mesh colander set firmly over a large mixing bowl. Sprinkle the pile very generously with coarse kosher salt. Toss the mixture well with your hands to ensure even coverage, and let it sit entirely undisturbed for exactly fifteen minutes. Watch in amazement as a massive puddle of dark green water forms at the bottom of the bowl.
Step 3: The Maximum Squeeze
Transfer the wilted, salted shreds directly into the dead center of a perfectly clean, lint-free cotton kitchen towel. Gather the four corners of the towel tightly together, twist them firmly, and physically squeeze the bundle over the sink with all your available might. Keep twisting and pressing until not a single drop of liquid falls out. Your arms might burn slightly, but this is the secret to success.
Step 4: The Flavor Matrix
In a separate large glass mixing bowl, vigorously beat two large, room-temperature eggs until frothy. Stir in exactly a half cup of unbleached all-purpose flour, a half cup of finely grated, high-quality parmesan cheese, two finely minced fresh garlic cloves, and a large handful of freshly chopped flat-leaf parsley. Add a heavy pinch of freshly cracked black pepper for heat.
Step 5: The Batter Integration
Carefully fold your ultra-dry, tightly squeezed vegetable shreds directly into the waiting egg and flour mixture. Use a rubber spatula to mix thoroughly until absolutely every single green strand is perfectly coated. The resulting batter should look incredibly thick, chunky, and cohesive, not runny or thin in the slightest.
Step 6: The Perfect Fry
Heat a quarter-inch layer of good quality olive oil in a heavy, well-seasoned cast-iron skillet over medium-high heat. Wait until the oil shimmers slightly. Carefully drop heaping tablespoons of the thick batter right into the hot oil, spacing them out so they do not touch. Flatten each mound slightly with the back of a metal spatula. Fry them completely undisturbed for roughly three full minutes per side until they become deeply, wonderfully golden brown.
Step 7: The Drain and Serve
Swiftly transfer the piping hot, cooked patties to a wire cooling rack securely set over a metal baking sheet. Aggressively avoid placing them on paper towels, as the paper will trap rising steam and immediately ruin the hard-earned crust. Serve them immediately while still hot, perhaps with a generous dollop of cold sour cream or a bright squeeze of fresh lemon juice. Enjoy your hard-earned culinary masterpiece!
There is a massive amount of terrible misinformation out there on the internet about frying vegetables. Let us permanently clear up some extremely common misunderstandings right now.
Myth: You absolutely must meticulously peel the dark green skin off the squash before grating it.
Reality: The skin actually holds a massive amount of the vegetable’s total flavor, essential vitamins, and crucial structural integrity. Leaving the skin completely intact gives the final dish a beautifully rustic, green-flecked appearance and actively prevents the delicate interior strands from completely disintegrating into unappetizing mush during the intense cooking process.
Myth: Baking the batter in the oven is exactly the same as frying it in oil.
Reality: While baking is certainly a healthier alternative for those watching their fat intake, you absolutely will not ever achieve the same iconic, deeply satisfying crispy edges. Oven-baking physically produces a much softer, highly uniform, almost muffin-like texture rather than the violently crisp exterior of a true, authentic fritter.
Myth: You can completely skip the annoying salting step if you are in a massive hurry for dinner.
Reality: Skipping this crucial step is hands-down the fastest possible way to completely ruin the entire dish. The wet batter will violently release its hidden water the absolute second it hits the boiling hot oil, immediately dropping the temperature and resulting in a horribly soggy, greasy, and completely inedible blob. Always take the time to salt.
Can I make the batter completely ahead of time?
No, you really cannot. The raw vegetables will stubbornly continue to release hidden water as they sit, inevitably making the batter way too thin to hold its shape. You must fry the mixture immediately after you finish mixing it together.
What is the absolute best oil to use for this recipe?
A light, refined olive oil or a completely neutral cooking oil like avocado, grapeseed, or canola works absolutely perfectly for handling the required high-heat frying without burning.
Can I successfully freeze the leftovers for later?
Yes, you definitely can! Freeze them completely flat in a single layer on a baking sheet first, then transfer them to an airtight bag. Reheat them directly from frozen in a hot 400°F oven to perfectly restore their original crispness. Never put them in the microwave.
Why are my patties falling apart in the pan?
You either did not use enough physical force to squeeze out the excess water, or your eggs were too small and you desperately need slightly more flour to properly bind the wet mixture together.
Can I easily make these completely gluten-free?
Absolutely, without a doubt. Simply substitute the standard all-purpose wheat flour with high-quality almond flour or any standard 1-to-1 gluten-free baking blend available at your local grocery store.
Do I strictly need to use real eggs?
Eggs are scientifically the absolute best binder for this specific chemical reaction, but a thick, well-hydrated flax egg can definitely work quite well as a totally viable vegan alternative.
What dipping sauce pairs best with these?
Classic cool Tzatziki, a sharp garlic aioli, or even just plain, full-fat Greek yogurt mixed with a squeeze of fresh lemon are universally fantastic, crowd-pleasing choices.
These golden, impossibly crispy delights are an absolute, undeniable game-changer for your regular weekly meal rotation. They are incredibly quick to whip up, highly budget-friendly for large families, and pack an unbelievably massive savory punch that satisfies deep cravings. Do not wait around for a fancy special occasion to try them—grab some fresh, vibrant produce from the store, fire up your favorite heavy skillet, and try cooking them tonight! Your taste buds, and your family, will thank you endlessly.


Leave a Reply