
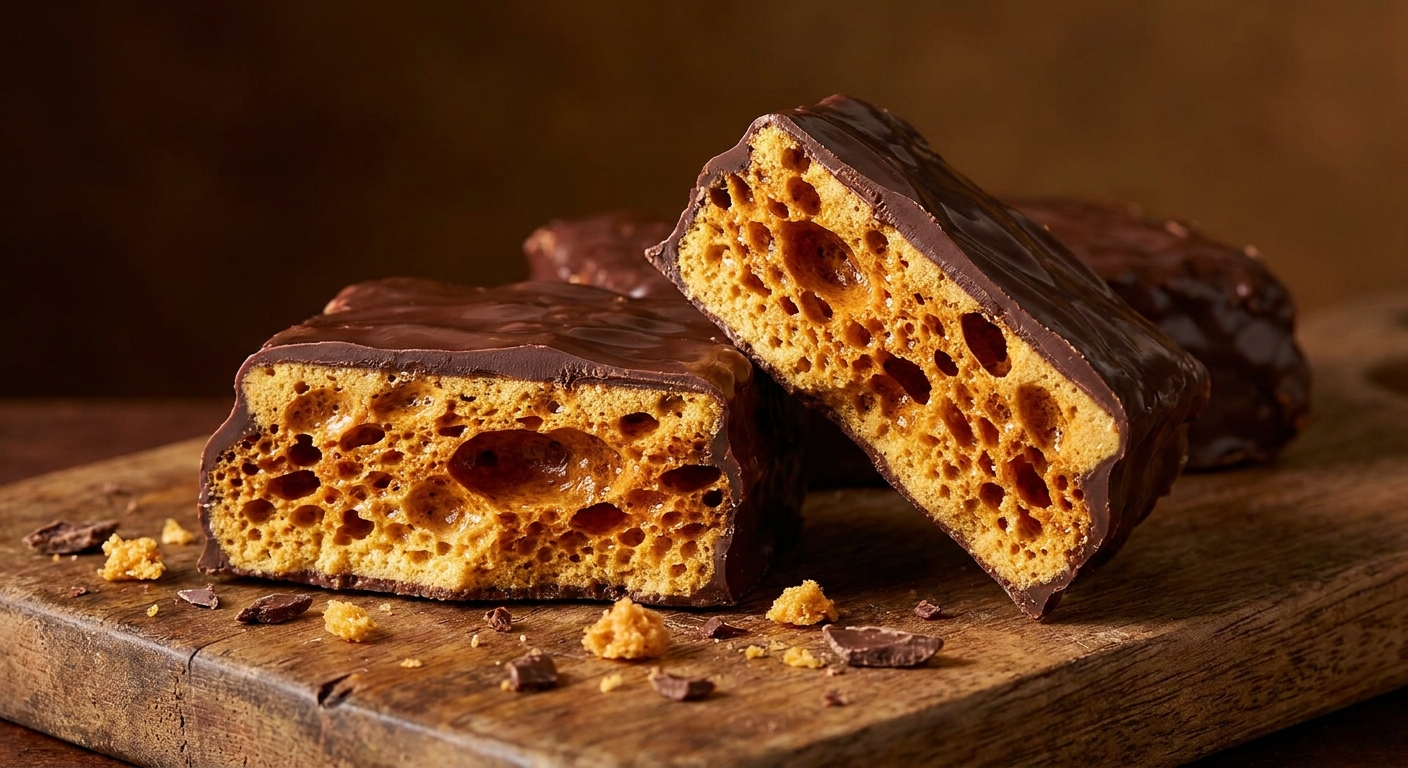
The Ultimate Sponge Toffee Chocolate Bar Experience
Let me tell you right off the bat, biting into a fresh sponge toffee chocolate bar is the most satisfying sweet crunch you will ever experience. Seriously, there is nothing quite like that dramatic shatter of golden, aerated sugar followed instantly by the smooth, rich melt of high-quality cocoa on your tongue. As a content specialist working out of a cozy, bustling cafe here in Kyiv, I see endless food trends flash across my screens daily. Yet, the deep, nostalgic craving for this particular honeycomb treat never fades. Back in my childhood, we did not always have access to fancy imported sweets from overseas. Discovering the absolute magic of making bubbling, expanding sugar right in my own modest kitchen was honestly a game-changer. It felt like holding pure culinary alchemy in my hands.
This guide breaks down absolutely everything you need to know about the sweet science of bubbling sugar, alongside a foolproof seven-day mastery plan for making your own perfect batches. Whether you call it cinder toffee, hokey pokey, or honeycomb, wrapping it in a thick layer of premium cocoa elevates it from a simple sugary snack to a top-tier dessert. I am going to share exactly how you can recreate this iconic confection perfectly. By the time you finish reading, you will be fully equipped to skip the candy aisle and craft a treat that beats any commercial brand on the market.
Why You Need This Sweet Masterpiece in Your Life
Look, there is a very distinct reason why the combination of airy sugar and dense cocoa works so incredibly well together. It is an exercise in perfect contrasts. The interior is wildly crisp, tasting faintly of toasted caramel and roasted molasses, while the exterior provides a creamy, bitter-sweet barrier that balances out the intense sweetness. If you just eat plain honeycomb, it can be overwhelmingly sweet. But the moment you introduce a solid coating of dark or milk cocoa, the flavor profile balances out beautifully.
Let us look at how different versions stack up when you are trying to satisfy that specific craving. Below is a quick breakdown comparing your main options:
| Type of Confection | Crunch Factor | Flavor Profile |
|---|---|---|
| Commercial Store-Bought | Moderate (often slightly softened) | Extremely sweet, standardized cocoa |
| Artisanal Bakery | High (usually very fresh) | Complex, often uses dark single-origin cocoa |
| Homemade Kitchen Batch | Maximum (eaten straight after setting) | Highly customizable, intense toasted caramel notes |
The value of making this yourself goes far beyond just saving a few dollars at the grocery store. Here are a few concrete examples: first, you completely control the quality of the ingredients. You can use an ultra-premium 70% dark cocoa shell instead of the cheap compound coatings used by massive factories. Second, you can dictate the exact level of caramelization. Want a darker, more bitter molasses note? Just leave the sugar on the stove for an extra thirty seconds.
Here are three undeniable reasons why you should prioritize making this at home:
- Unbeatable Texture Contrast: When you make it yourself, the candy barrier remains completely uncompromised by long transport times, meaning you get the loudest, most satisfying snap possible.
- Complete Customization Potential: You can sprinkle flaky sea salt, crushed nuts, or even a dash of cayenne pepper on the wet coating before it sets to create a signature flavor.
- The Sheer Joy of the Process: Watching the amber syrup violently erupt and multiply in volume when you whisk in the alkaline powder is genuinely one of the most entertaining kitchen experiments you can perform.
The Humble Origins of Honeycomb
To truly appreciate what you are eating, you have to look back at where it came from. The origins of this bubbly confection date back to the early 1900s. People across the globe quickly realized that adding an alkaline powder to hot, acidic sugar syrup created a magnificent chemical reaction. In the United Kingdom, folks started calling it cinder toffee because the porous, airy chunks resembled the lightweight cinders left over from a coal fire. It was a cheap, cheerful sweet that required very few ingredients—just sugar, corn syrup, and a leavening agent—making it highly accessible during tougher economic times.
Evolution Across Continents
As the recipe traveled, so did its names and variations. In Australia, it gained fame in the 1910s and became a massive commercial success. Over in New Zealand, it was affectionately dubbed hokey pokey, eventually becoming their most iconic ice cream flavor. North America saw its own boom in the 1920s when a famous manufacturer decided to mass-produce the honeycomb and drench it in milk chocolate, creating a legendary candy bar that is still devoured by millions today. The brilliant addition of the fat-based coating wasn’t just for flavor; it acted as a crucial moisture barrier that prevented the highly hygroscopic sugar from weeping and turning into a sticky puddle on store shelves.
The Modern State of Sponge Candy
Now that we are in 2026, the global appreciation for this retro candy has seen a massive resurgence. High-end pastry chefs are incorporating shards of it into fine dining plated desserts, and boutique chocolatiers are selling small-batch versions for premium prices. Modern kitchen equipment, like hyper-accurate digital instant-read thermometers, has made the previously intimidating process of boiling sugar accessible to absolutely anyone. We no longer have to guess when the syrup hits the hard crack stage; technology guarantees a perfect outcome every single time.
The Thermal Decomposition of Baking Soda
Honestly, the chemistry behind this is fascinating. You are essentially creating a glass matrix filled with trapped gas. When you heat your sugar, corn syrup, and water mixture to exactly 300°F (149°C), you are entering the hard crack stage. At this point, almost all the water has evaporated. The magic happens the exact second you vigorously whisk in pure baking soda (sodium bicarbonate). The high heat causes the baking soda to undergo thermal decomposition, rapidly releasing thousands of tiny carbon dioxide bubbles. Because the sugar syrup is incredibly viscous, these bubbles cannot escape. They get trapped, forcing the entire liquid mass to aggressively expand up to four times its original volume.
Achieving the Perfect Chocolate Temper
Once you have your magnificent golden block of aerated sugar, you cannot just dip it in melted cocoa chips and expect a professional finish. You need to temper it. Tempering is the process of heating and cooling cocoa butter to stabilize its crystal structure. If you just melt and dip, the coating will be soft, streaky, and bloom with ugly white spots. Proper tempering ensures a glossy finish and a sharp snap that mimics the texture of the candy inside.
- Temperature Milestones: Dark cocoa must be heated to 120°F (49°C), cooled to 82°F (28°C), and gently reheated to 90°F (32°C) to form stable Beta V crystals.
- Moisture Sensitivity: The sugar center is highly hygroscopic. If the coating has any holes, humidity will enter and dissolve the honeycomb from the inside out.
- The Maillard Reaction: The distinct caramel flavor of the interior comes from the Maillard reaction, which accelerates rapidly between 280°F and 300°F (138°C to 149°C).
- Alkaline Neutralization: The slightly metallic taste you sometimes get is unreacted sodium carbonate; using exact measurements prevents this flavor flaw.
Day 1: Gather Premium Ingredients
You cannot build a masterpiece with subpar materials. Sourcing matters. Today, you need to acquire filtered water, fresh baking soda (throw out the box that has been sitting in your fridge for a year), pure cane sugar, high-quality golden syrup or corn syrup, and premium couverture cocoa discs. Do not buy standard baking chips; they contain stabilizers that prevent proper melting and setting.
Day 2: Calibrate Your Thermometer
Candy making is a science of exact degrees. Boil a pot of water. Your digital thermometer should read exactly 212°F (100°C) at sea level. If it is off by even a few degrees, you must adjust your target temperature accordingly. A faulty reading will result in either a sticky, chewy mess or a burnt, bitter disaster.
Day 3: Master the Sugar Boil
Practice makes perfect. Combine your sugar, syrup, and water in a heavy-bottomed stainless steel saucepan. Turn the heat to medium. Resist the urge to stir. Stirring causes crystallization. Simply swirl the pan gently. Watch the temperature climb patiently until it hits that crucial 300°F (149°C) mark. The syrup will transition from clear to a beautiful golden amber color.
Day 4: Execute the Baking Soda Reaction
This is the main event. Have your baking soda sifted and ready in a small bowl. The moment your thermometer beeps at 300°F (149°C), remove the pan from the heat. Dump in the baking soda and whisk vigorously, but only for about three to four seconds. The mixture will erupt into a foaming, golden cloud. Immediately pour it onto a silicone-lined baking sheet.
Day 5: The Cooling and Shattering Phase
Do not touch the golden cloud! Let it sit entirely undisturbed at room temperature for at least two hours. Once it is completely cool and rock solid, take a heavy knife or a rolling pin and shatter the block into bite-sized, jagged shards. Brush off any excess dust.
Day 6: Tempering the Chocolate Shell
Set up a double boiler. Melt two-thirds of your couverture to 120°F (49°C). Remove from heat and seed it with the remaining one-third of unmelted discs, stirring constantly until the temperature drops to 82°F (28°C). Briefly place it back over the warm water until it reaches exactly 90°F (32°C). You now have liquid silk.
Day 7: Final Coating and Tasting
Using a dipping fork, submerge each golden shard into the tempered liquid. Tap off the excess so you have a thin, even shell. Place them onto parchment paper and sprinkle with a few flakes of sea salt before they set. Wait ten minutes, then take your first glorious, crunching bite.
Myths and Reality of the Golden Crunch
Let’s clear up some common misunderstandings that hold people back from making this treat.
Myth: You need a professional culinary degree to attempt boiled sugar recipes.
Reality: It is actually a very straightforward fifteen-minute process. As long as you own a ten-dollar digital candy thermometer, you have all the expertise you need.
Myth: Honeycomb candy contains large amounts of actual honey.
Reality: There is zero honey in the traditional recipe! It is made entirely of sugar and corn syrup. The name comes purely from the visual similarity to a bee’s honeycomb.
Myth: The cocoa coating ruins the crunch by making the sugar soggy.
Reality: It does the exact opposite. The fat in the coating acts as an impenetrable barrier, locking out humidity and preserving the crunch for weeks.
Myth: You can easily substitute baking powder if you run out of baking soda.
Reality: Absolutely not. Baking powder contains added acids and starches that completely alter the chemical reaction and ruin the texture.
Can I freeze the finished candy?
No, freezing introduces condensation when you thaw it. The moisture will instantly dissolve the sugar center, leaving you with a sticky, hollow shell.
Why did my sugar mixture deflate?
You likely whisked the baking soda for too long. You only need a few rapid stirs. Over-mixing knocks the delicate carbon dioxide bubbles right out of the syrup.
Is this treat inherently gluten-free?
Yes, all the base ingredients—sugar, syrup, baking soda, and pure cocoa—are naturally free of gluten. Just double-check your manufacturing labels for cross-contamination.
How long does the homemade version last?
If fully encased in tempered cocoa and stored in an airtight container at room temperature, it will easily retain its perfect crunch for up to three weeks.
What percentage of cocoa is best?
I highly recommend a 60% to 70% dark couverture. The bitterness cuts through the extreme sweetness of the aerated caramel center beautifully.
Why does my batch taste burnt or bitter?
You either let the sugar exceed 305°F (151°C) or you used too much baking soda. Excess baking soda leaves a harsh, soapy, metallic aftertaste.
Can I skip the corn syrup?
Corn syrup prevents the granulated sugar from crystallizing. You can substitute it with golden syrup or brown rice syrup, but you cannot omit an invert sugar entirely.
What is the absolute best storage method?
Keep them in a cool, dark cupboard in a sealed glass container. Never put them in the refrigerator, as the humidity inside a fridge is the enemy of spun sugar.
There you have it. You are now fully prepared to tackle this legendary confection. The contrast of the shattered golden center against the smooth, dark exterior is an experience that simply never gets old. Grab your thermometer, measure out your ingredients, and start crafting your own incredible batch today. Happy candymaking!
Leave a Reply