
The Ultimate Guide to Baking Perfect Savoiardi Lady Fingers
Grab your whisk, because baking perfect savoiardi lady fingers at home is honestly so much easier than you probably think. I remember standing in a small, bustling bakery right here in Kyiv a few months ago, the rich smell of vanilla and toasted sugar completely filling the air. The pastry chef there handed me a fresh, warm biscuit and taught me a secret about getting that signature sugary crust without losing the airy, melt-in-your-mouth sponge texture inside. You absolutely do not need fancy commercial equipment for this, just a little patience and the right folding technique. These iconic Italian biscuits form the absolute backbone of a proper tiramisu and countless other layered desserts. We are going to walk through exactly how to master the batter, achieve the perfect pipe, and bake them to a crisp yet spongy perfection. Trust me on this one, once you make your own batch from scratch, you will never go back to those dry, store-bought boxes that literally crumble to dust the second you touch them. Baking these golden sponges is like a delicious rite of passage for any serious home baker. Let’s grab some eggs, sugar, and flour, and create something genuinely amazing together.
Why Homemade Always Wins
What actually makes a sponge biscuit worth eating? The massive value proposition of homemade biscuits lies completely in their incredible moisture absorption capabilities. Unlike dense, heavy cookies, a proper sponge acts like a sweet, porous cushion, soaking up coffee, liquor, or fruit syrups while magically holding its structural integrity. You get all the flavor without the mush. For example, when you dip them in strong, dark espresso for a classic tiramisu, they hold the liquid securely while maintaining a slight bite. Another great example is a traditional trifle dessert, where the sponge base absorbs sweet sherry and fresh berry juices, yet still provides a distinct, cake-like layer that doesn’t just turn into a puddle of soup.
| Quality Check | Store-Bought Brands | Homemade Excellence |
|---|---|---|
| Texture Profile | Brittle, overly dry, snaps easily | Crisp pearl sugar outside, soft airy inside |
| Flavor Depth | Artificial vanilla extract flavoring | Rich egg yolk and real vanilla bean |
| Liquid Absorption | Turns to paste almost immediately | Holds shape firmly when soaked in coffee |
To get that perfect texture, you need to follow a few core rules. Making the batter is all about managing air.
- Separate the eggs flawlessly: Any microscopic trace of fat or yolk in your whites will absolutely ruin the meringue structure. You need a stiff, glossy peak.
- Sift the flour twice: You need maximum aeration so the dry ingredients fold in quickly without deflating the delicate batter you just spent time whipping.
- Dust before baking: A double layer of powdered sugar creates that iconic crispy pearl top that acts as a moisture barrier.
If you master these three rules, you are well on your way to dessert perfection. The technique really is just about keeping a light hand and moving swiftly before the bubbles pop.
The Royal Origins
The story behind these treats is honestly fascinating. Back in the late 15th century, at the highly influential court of the Duchy of Savoy, bakers were constantly trying to impress visiting royalty. They created a light, sweet sponge cake specifically for the visit of the King of France. The royals loved it so much that it quickly became an official court biscuit. They were given the name specifically to honor the Savoy region, cementing their status as a luxury item meant for the absolute elite of European society. Imagine eating the exact same snack that French kings enjoyed centuries ago!
The Evolution Across Europe
As time went on, the recipe traveled far beyond the borders of Italy. In France, they became known as ‘boudoirs’, often served alongside champagne. Over in England, bakers started calling them by the name we often use today, describing their elongated, delicate shape. Every culture seemed to adopt them, tweaking the recipe slightly, but the core foundation of whipped eggs, sugar, and flour remained completely intact. They became the ultimate dipping cookie, perfect for softening up in hot tea, sweet wine, or rich coffee.
Modern State of Baking
Fast forward to the year 2026, and the global baking community has completely embraced the artisanal revival of these biscuits. We are seeing high-end cafes across the globe, from Rome to Tokyo to local spots here in Ukraine, ditching commercial suppliers and baking their sponges in-house daily. Bakers are experimenting with adding matcha powder, freeze-dried raspberry dust, and even activated charcoal, but the classic vanilla bean version still reigns supreme. The modern appreciation for simple, high-quality ingredients has really brought this historic recipe back into the spotlight where it belongs.
The Science of Meringue Stability
Let’s talk about the actual science happening in your mixing bowl. Egg whites contain roughly 90 percent water and 10 percent proteins. When you aggressively whisk them, you are literally unfurling those tightly coiled protein molecules—a process called denaturation. These proteins then bond together, trapping air bubbles and water to create a stable foam network. Adding sugar at the exact right moment acts as a powerful hygroscopic agent. It binds to the water in the egg whites, locking in moisture and severely delaying the drainage of the foam. This means your batter stays fluffy and lifted while you fold in the yolks and flour, giving you that perfect airy crumb structure.
Flour Hydration and Structure
The other massive scientific element here is how the flour interacts with the wet ingredients. Because there is absolutely no chemical leavening agent like baking powder in a traditional recipe, all the lift comes from the trapped air expanding when it hits the heat of the oven. We specifically want minimal gluten development. If you overmix the batter, the gluten proteins in the flour will align and create a tough, rubbery cookie. By gently folding the sifted flour, you just hydrate the starches enough to provide structural support during gelatinization in the oven, without triggering the elastic gluten network.
- Heat expands trapped air bubbles before the egg proteins fully coagulate, resulting in a dramatic spongy lift.
- The double dusting of sugar dissolves slightly into the surface moisture, then crystallizes in the heat to form the famous crisp shell.
- Maillard browning occurs specifically on the ridges piped by your bag, creating those beautiful golden edges.
Step 1: Prep Your Station
Baking moves fast once the eggs are whipped, so you absolutely must have everything ready. Preheat your oven to 375 degrees Fahrenheit. Line two large, flat baking sheets with high-quality parchment paper or a silicone baking mat. Prepare your piping bag by snipping the end and fitting it with a simple half-inch round tip. Measure out your sugar, sift your flour into a bowl, and separate your eggs while they are cold. Let the separated eggs sit until they reach room temperature for maximum volume.
Step 2: Whip the Egg Whites
Place your room-temperature egg whites into a meticulously clean, grease-free glass or metal bowl. Start beating on medium speed until they become frothy and opaque. Gradually stream in exactly half of your measured granulated sugar, a little bit at a time. Increase the speed and whip until you achieve glossy, stiff peaks. If you turn the whisk upside down, the peak should stand straight up without drooping over at all.
Step 3: Beat the Yolks
In a separate bowl, combine your egg yolks, the remaining half of your granulated sugar, and a generous splash of real vanilla extract. Beat this mixture vigorously until it becomes very pale, thick, and falls back onto itself in a slow ribbon when you lift the beaters. This ribbon stage is crucial because it means the sugar is fully dissolved into the fat of the yolks.
Step 4: The Crucial Fold
This is where dreams are made or broken. Pour the thick egg yolk mixture over your stiff egg whites. Using a large, flexible silicone spatula, gently fold the two together, cutting down the middle and sweeping up the sides. When it is about halfway combined, sprinkle the double-sifted flour over the top. Continue folding with a light, confident hand just until the last streaks of dry flour completely disappear. Do not overmix!
Step 5: Piping the Batter
Immediately transfer your airy batter into your prepared piping bag. Do this gently so you don’t pop the air bubbles. Pipe straight lines onto your parchment-lined baking sheets, making them about four inches long and leaving a solid inch of space between each one, as they will spread and puff up slightly in the oven. Try to keep the pressure consistent so they bake evenly.
Step 6: The Double Dusting
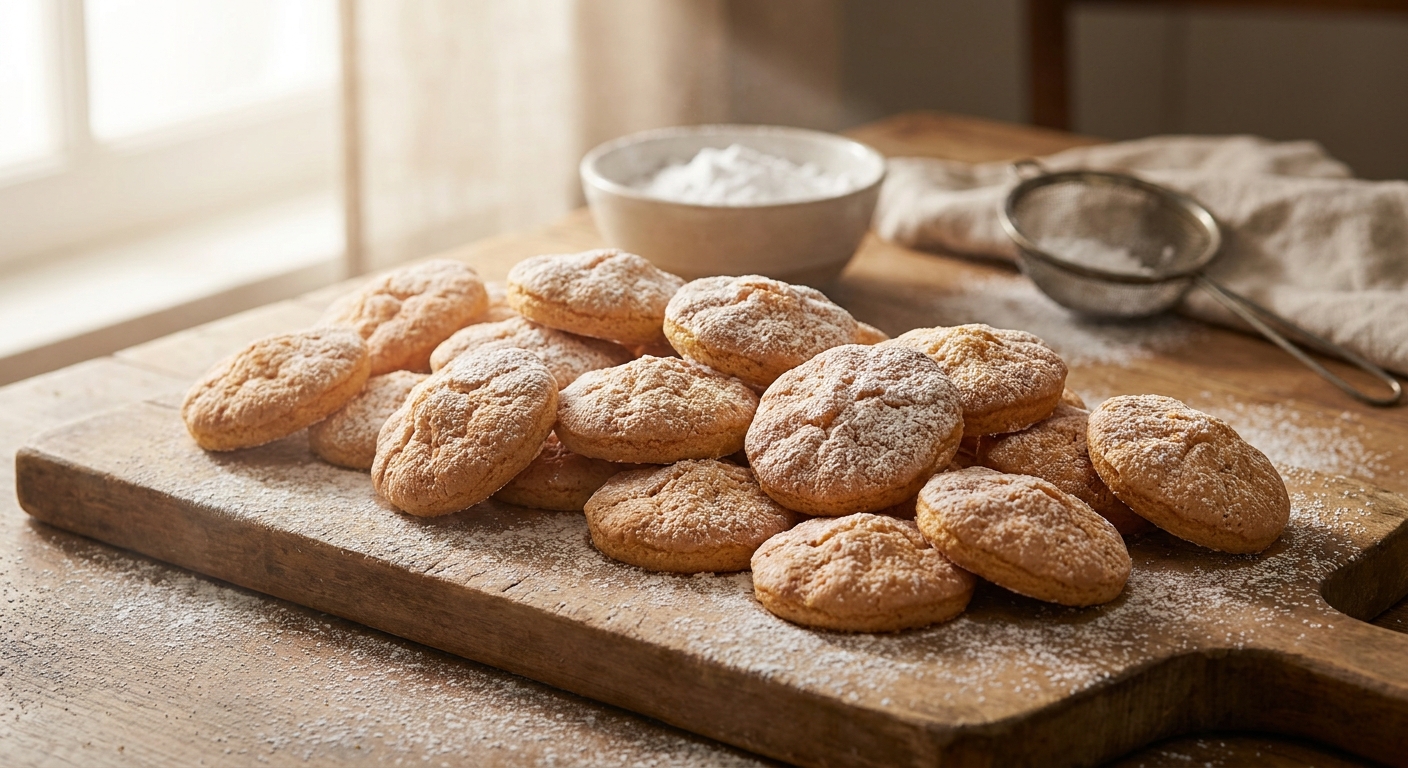
Grab a fine-mesh sieve and aggressively dust the piped batter with a thick layer of powdered sugar. Wait exactly one minute so the first layer of sugar absorbs into the surface moisture of the batter, and then generously dust them a second time. This specific double-dusting technique is the absolute non-negotiable secret to achieving that bakery-style cracked, crispy top.
Step 7: Bake and Cool
Slide the baking sheets into your fully preheated oven. Bake them for about 12 to 15 minutes. You are looking for a pale golden color overall, with slightly darker, toasted edges. Do not open the oven door during the first ten minutes, or the sudden draft of cold air might cause them to collapse. Once done, let them cool entirely on the baking sheet; they will crisp up significantly as they come down to room temperature.
Separating Fact from Fiction
There is a lot of bad advice floating around on the internet regarding delicate sponge cakes. Let’s clear up some of the most common misconceptions right now.
Myth: You need to add baking powder or baking soda to get them to rise properly.
Reality: The lift comes entirely and exclusively from the mechanical aeration of the whipped egg whites expanding in the heat of the oven.
Myth: The store-bought versions are literally just as good for making tiramisu.
Reality: Store-bought versions are severely dehydrated to extend shelf life, meaning they instantly turn to mush when soaked. Homemade retains an amazing structural bite.
Myth: You must eat them fresh out of the oven on the very first day.
Reality: Storing them in an airtight container for a few days actually dries them out a tiny bit more, which drastically improves their liquid-soaking capabilities for layered desserts.
Can I freeze the baked biscuits?
Yes, absolutely. Once they are completely cool, layer them between sheets of parchment paper in an airtight freezer bag. They freeze beautifully for up to a full month.
Why are my biscuits totally flat?
This usually happens if your egg whites weren’t whipped to stiff peaks, or if you were way too aggressive during the folding stage and knocked all the trapped air out of the batter.
Do I actually need a piping bag?
While you can technically try to spoon the batter into a zip-top bag and snip the corner, a proper piping bag with a round tip gives you the best, most consistent shape.
Can I make these totally gluten-free?
Yes! You can substitute the regular all-purpose wheat flour with a high-quality 1:1 gluten-free baking blend that contains xanthan gum. The texture holds up remarkably well.
What type of sugar is best for the dusting?
Standard powdered sugar (confectioner’s sugar) is the absolute best choice. Some bakers like to mix in a tiny pinch of granulated sugar for extra crunch, but powdered is mandatory.
How long do they realistically take to bake?
In most standard home ovens, they take exactly 12 to 15 minutes at 375 degrees Fahrenheit. Watch them closely after the 10-minute mark to prevent burning.
Why did mine turn out super sticky?
If they are sticky to the touch after cooling, they were likely underbaked, or your kitchen has extremely high humidity. Just pop them back in a warm oven for a few minutes to dry out.
Wrapping Up Your Baking Adventure
So there you have it, everything you could possibly need to master this incredible dessert staple right in your own kitchen. Baking is all about having fun, learning the science behind the ingredients, and treating your friends and family to something genuinely special. Don’t be intimidated by whipping egg whites or folding delicate batters. With these detailed steps, you are completely equipped to create an absolute masterpiece. Now, preheat that oven, crack some eggs, and start baking today!
Leave a Reply