
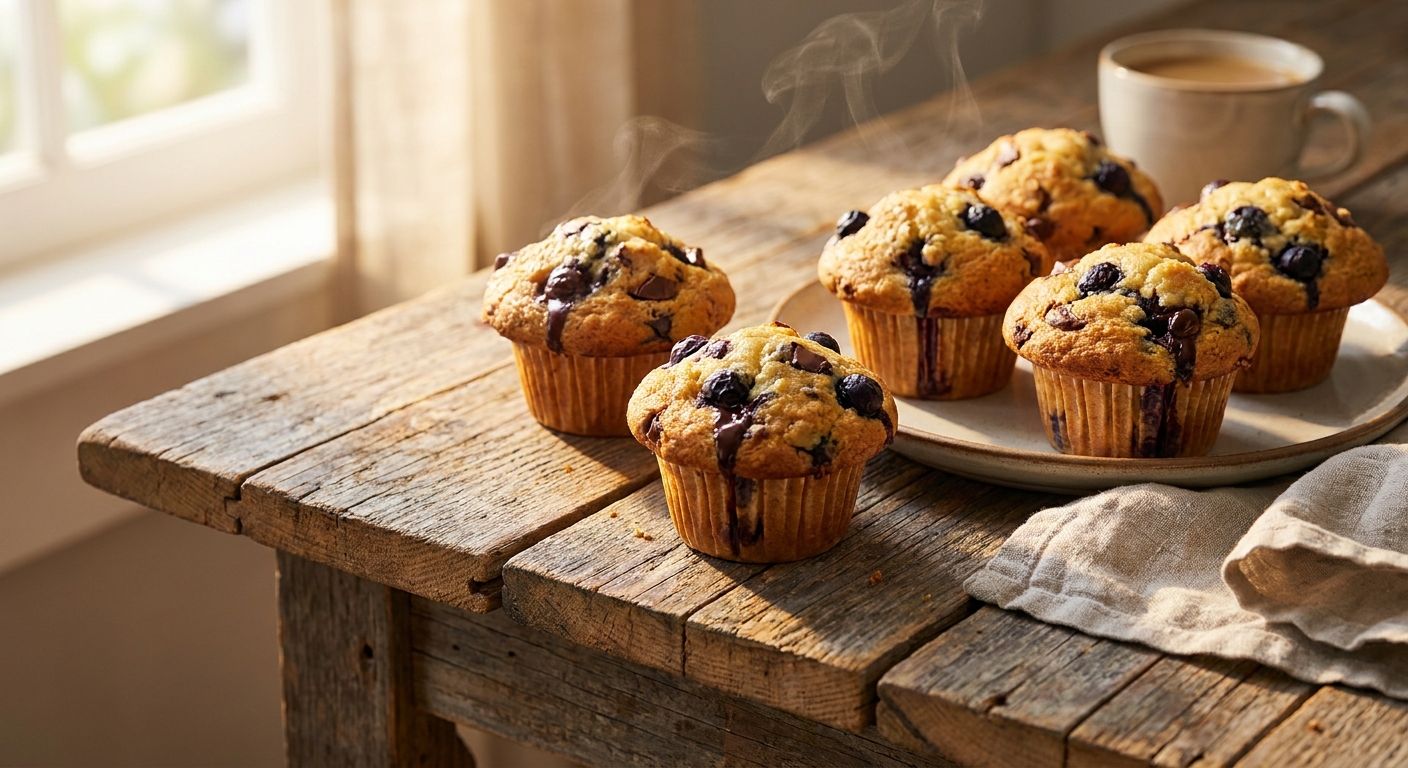
My Secret to the Best Blueberry Chocolate Chip Muffins
Hey there! Let me tell you about a massive obsession of mine: baking the absolute perfect blueberry chocolate chip muffins. If you haven’t tried combining the tart, juicy burst of fresh summer berries with the rich, melting sweetness of semi-sweet chocolate, you are seriously missing out on one of life’s greatest simple pleasures. It’s a flavor combination that sounds like it shouldn’t work—almost like two different bakery worlds colliding—but trust me, it creates an absolute masterpiece in your mouth.
I still remember a chilly, rainy afternoon working at a tiny independent café tucked away in the historic Podil district of Kyiv. The wind was howling outside, and the espresso machine was hissing, but all anyone could focus on was the smell radiating from the kitchen. Our head baker had accidentally spilled a handful of dark chocolate chunks into the standard blueberry batter. Instead of throwing it out, she baked it. That happy accident became the shop’s best-selling item for the next three years. It completely changed my perspective on what makes a baked good truly memorable. The magic is all in the contrast, and once you nail the base recipe, you will look like a baking genius to your friends and family.
Today, I’m going to walk you through exactly how to recreate that café magic in your own kitchen, without any fancy equipment or culinary degrees. Grab a cup of coffee, and let’s get into the sweet details.
To truly master this recipe, we need to talk about why this combination hits all the right sensory notes. It’s all about balance. The acidity of the berries cuts right through the heavy richness of the cocoa butter. When you take a bite, you get the soft, tender crumb of a vanilla-scented cake, followed by a sharp, fruity pop, and finished with a lingering chocolatey warmth. Think about the value this brings to your daily routine! Imagine waking up on a Tuesday, reheating one of these beauties, and feeling like you’re sitting in a high-end bistro. Or picture bringing a batch to your next office meeting—you will instantly become the favorite coworker. These aren’t just snacks; they are edible mood boosters.
| Base Ingredient | Baking Purpose | Vegan / Healthy Alternative |
|---|---|---|
| Whole Milk | Provides moisture and tenderizes the crumb | Oat milk with a splash of apple cider vinegar |
| Unsalted Butter | Creates rich flavor and soft texture | Melted coconut oil or unsweetened applesauce |
| White Sugar | Sweetens and helps brown the muffin tops | Coconut sugar or maple syrup (reduce liquids slightly) |
Now, getting that perfect bakery-style dome isn’t just about throwing things in a bowl. Listen, there is a science to the rise. Here are three absolute non-negotiable rules for getting that gorgeous, towering muffin top:
- Rest the batter: After mixing, let the batter sit at room temperature for 15 to 30 minutes. This allows the flour to hydrate fully and gives the baking powder a head start.
- The double-temperature bake: Start your oven blazing hot at 425°F (220°C) for the first 5 minutes to rapidly activate the leavening agents, then drop it to 350°F (175°C) for the remaining time to bake the center without burning the edges.
- Fill them to the brim: Forget filling the liners only two-thirds full. If you want huge tops, fill those paper cups all the way to the top!
Origins of the American Quick Bread
So, where did this whole concept even come from? The word “muffin” actually has roots in the old French word moufflet, which referred to a soft bread. But the muffins we know and love today—the sweet, cake-like quick breads—are distinctly North American. Back in the 18th and 19th centuries, bakers needed a fast way to make individual portions of bread for breakfast without waiting hours for yeast to rise. The invention of pearlash (an early form of baking soda) changed the game entirely. Suddenly, you could whip up a batch of dough, throw it in hot tins, and have breakfast ready in twenty minutes.
Evolution of the Fruit and Chocolate Mashup
For the longest time, muffin flavors stayed highly traditional. You had bran, corn, and eventually the classic blueberry, which became the undisputed king of breakfast pastries across North America. Chocolate chips didn’t even enter the commercial baking scene until the late 1930s when Ruth Wakefield invented the chocolate chip cookie. It took a few more decades for rebellious home bakers to start throwing those little morsels into their breakfast batters. The combination of fruit and chocolate was often reserved for fancy truffles or dipped strawberries, but integrating them into a rustic morning pastry was a bold move that paid off massively.
The Modern State of Bakery Treats in 2026
Fast forward to where we are now. Now that we are well into 2026, the global baking scene is wilder and more experimental than ever. People aren’t satisfied with just “vanilla” or “plain.” We want hybrids. We want texture contrasts. The local bakeries in my neighborhood constantly push boundaries, but the fusion of antioxidant-rich berries and comforting dark chocolate remains a staple because it bridges the gap between a somewhat healthy breakfast and an indulgent dessert. It’s the ultimate crowd-pleaser for our fast-paced times.
The Chemistry of Muffin Batter
Alright, let’s get a little nerdy for a second because understanding the chemistry of your batter will make you a far better baker. A muffin is essentially a chemical reaction suspended in a protein web. When you mix your wet ingredients with your dry ingredients, two main things happen. First, the baking powder (which contains both an acid and a base) reacts with the liquid to create carbon dioxide bubbles. Second, the proteins in the flour (glutenin and gliadin) bind together to form gluten. You want enough gluten to hold the bubbles and give the muffin structure, but not so much that it becomes chewy like pizza dough. This is why you must mix the batter strictly until the flour just barely disappears!
Moisture, Fat, and Fluffiness
Fat is your best friend when it comes to tenderness. Whether you use butter, oil, or a mix of both, fat physically coats the flour proteins, preventing them from forming overly strong gluten bonds. This results in a crumb that falls apart beautifully in your mouth. Moisture, on the other hand, turns to steam in the hot oven, forcing the batter upward. Let’s break down some hardcore baking facts:
- The Maillard Reaction: This is the chemical process between amino acids and reducing sugars that gives browned food its distinctive flavor. It’s why the golden-brown muffin tops taste exponentially better than the pale bottoms.
- Baking Soda vs. Baking Powder: Soda requires an external acid (like buttermilk or lemon juice) to activate, while powder has the acid built right in. Most muffin recipes use powder to ensure a reliable lift.
- Berry Bleed: Blueberries are highly acidic and packed with natural dyes. Tossing them in a tablespoon of flour before adding them to the batter creates a barrier that prevents your whole muffin from turning a weird shade of gray-green.
Ready to make this a lifestyle? I’ve put together a 7-day action plan for you to fully experience the joy of this recipe. Baking shouldn’t be a stressful one-off event; it should be a fun, week-long journey of eating and experimenting.
Day 1: Sourcing the Best Ingredients
Start your week by hitting up a local farmer’s market or your favorite grocery store. Look for firm, plump blueberries. If they are out of season, head straight to the freezer aisle—frozen wild blueberries pack incredible flavor. Don’t cheap out on the chocolate, either! Grab a block of high-quality semi-sweet chocolate and chop it yourself for those glorious, irregular puddles of goodness.
Day 2: Prepping the Berries and Chocolate
Get everything organized. Wash your fresh berries and let them dry completely on a paper towel. Water is the enemy of a thick batter. Chop your chocolate and store it in an airtight container. If you’re using frozen berries, leave them strictly in the freezer until the absolute last second so they don’t bleed everywhere.
Day 3: The Bake Day and Proper Cooling
This is the main event! Mix your batter gently, fill the tins high, and bake. The smell will be intoxicating. Now, here is the hardest part: let them cool in the pan for exactly 5 minutes, then transfer them to a wire rack. If you leave them in the hot tin, they will steam themselves and get soggy bottoms. Nobody wants a soggy bottom.
Day 4: Best Reheating Techniques for Leftovers
By day four, your treats might lose that fresh-out-of-the-oven magic. Don’t microwave them! Microwaving turns baked goods gummy. Instead, slice the muffin in half, spread a tiny bit of butter on the cut sides, and toast them face-down in a skillet for two minutes. The chocolate gets melty, and the edges get crispy. It’s heaven.
Day 5: Turning Stale Muffins into Bread Pudding
Got a couple left over that have gotten a bit dry? Tear them up into chunks, toss them in a baking dish, and pour a simple mixture of eggs, milk, vanilla, and cinnamon over them. Bake until golden and puffy. Blueberry chocolate bread pudding is a total game-changer for Sunday brunch.
Day 6: Creating the Ultimate Muffin Ice Cream Sundae
Let’s have some fun. Take a slightly warmed muffin, split it open in a bowl, and drop a massive scoop of premium vanilla bean ice cream right on top. The contrast of the cold, melting ice cream soaking into the warm, cakey crumb is unbelievable. It’s the ultimate weekend treat.
Day 7: Freezing Batches for Future Cravings
If you made a double batch, today is the day to preserve your hard work. Wrap each completely cooled muffin tightly in plastic wrap, then place them all in a heavy-duty zip-top freezer bag. They will keep beautifully for up to three months. When a craving hits, just thaw one at room temperature.
There is a lot of bad advice floating around the internet about baking. Let’s clear the air on a few common misunderstandings.
Myth: Fresh berries are always superior to frozen berries for baking.
Reality: Actually, frozen wild blueberries are often preferred by professional bakers! Because they are frozen at peak ripeness, they hold their shape incredibly well and offer a more concentrated, intense fruit flavor than out-of-season fresh berries.
Myth: You need an expensive stand mixer to make good bakery-style goods.
Reality: Please, put the mixer away! Using a heavy-duty mixer for quick breads almost guarantees you will overmix the batter, resulting in tough, dense hockey pucks. A simple whisk, a rubber spatula, and your own arm strength are the best tools for a tender crumb.
Myth: If the chocolate chips sink to the bottom, the batter is ruined.
Reality: Sinking add-ins just mean your batter might be a little too thin. You can easily fix this by tossing your chips and berries in a tablespoon of flour before folding them in, or simply chilling the batter for 20 minutes before scooping.
Can I use milk chocolate instead of semi-sweet?
Absolutely! However, keep in mind that milk chocolate has a much higher sugar content. Because the batter and the berries already bring a lot of sweetness to the table, semi-sweet or dark chocolate provides a better, slightly bitter contrast. But hey, it’s your kitchen—if you love super sweet treats, go for it!
Why did my muffins turn a weird shade of green?
Ah, the classic science experiment! This happens when the natural pigments in the berries (anthocyanins) react with too much alkaline baking soda in your batter. To prevent this, don’t overmix, use baking powder as directed, and toss your berries in flour before gently folding them in.
How long do these stay fresh on the counter?
Stored in an airtight container lined with a paper towel (to absorb excess moisture), they will stay soft and fresh for about 3 to 4 days at room temperature. Sticking them in the fridge extends their life to a week, but the cold temperature can dry out the crumb.
Can I easily make this recipe gluten-free?
Yes, you can! Swap the regular all-purpose flour for a high-quality 1-to-1 gluten-free baking blend that contains xanthan gum. You might need to let the batter rest for an extra 10 minutes so the gluten-free flours fully hydrate and don’t taste gritty.
Do I absolutely need to use paper liners?
Not at all. If you don’t have paper liners, you can generously grease your tin with butter or a non-stick baking spray. Some bakers actually prefer going liner-free because the edges of the batter get crispier when they touch the hot metal directly.
Can I add nuts to this batter?
Definitely. Chopped walnuts or pecans add a fantastic crunch and an earthy flavor that pairs wonderfully with the fruit and cocoa notes. Toast the nuts in a dry skillet for a few minutes before adding them to amplify their flavor.
What is the secret to getting them out of the pan cleanly?
Patience! Let them cool in the tin for exactly 5 to 10 minutes. This allows the crumb to set and firm up. If you try to pry them out while they are boiling hot, they will fall apart in your hands.
Listen, baking is meant to be joyful, a bit messy, and incredibly rewarding. Making a batch of blueberry chocolate chip muffins is the perfect way to spend a lazy morning or prep for a busy week. You get the comfort of a classic pastry with an unexpected, indulgent twist. So preheat that oven, get your bowls out, and start baking. Make sure to share this recipe with your friends, and let me know how your batch turns out!

Leave a Reply